

Investment Casting – Wax Processes
Part 2 –
Investment Casting – Wax Processes
For the second part of our “What is Investment Casting?” series we will be covering the wax process for investment casting in greater detail. This is the first stage in the process where wax patterns in the shape of the final part are created and attached to an assembly for further processing. This wax shape will help form a ceramic mould around it. Removing the wax will form a cavity which will eventually be filled with metal during casting. This is where the term “investment” comes into investment casting; the wax is invested to create the final part even though it is destroyed once it has served its purpose.
Be sure to check out Part 1 of this series, if you haven’t already. Part 1 lists an overview of the process with a video to better explain the basic concepts of investment casting.
Pattern Tooling Creation or Wax Prototyping –
One of two options can be used to begin the process. Either an aluminum tool must be created for wax injection or a pattern can be 3D printed in wax for rapid prototyping. 3D printing is very advantageous for verifying design changes but due to the cost of 3D printing, it is not economical at quantities over a very low threshold. For 3D printing, the casting supplier will modify the 3D model of the final part by adding material to account for the metal contraction once poured into the ceramic mold.
Another caveat of wax prototyping is that tooling dimensions cannot be verified. First Article Inspections (FAI) must be performed on parts injected in production tooling to validate the tooling dimensions and release the tooling for production orders. Any designs validated with prototyping would still need to be validated with an FAI once tooling was created. If wax prototyping is used, wax injection is not needed and the process skips straight to wax assembly. If tooling is chosen as the method, 3D models of the final part will be modified by the casting supplier to allow for the contraction of the metal and wax during solidification. Because wax and metal both are entered into their respective cavities in their liquid states, contraction from their amorphous state to their crystalline state results in quite a significant reduction in volume. This contraction rate is calculated and applied to all dimensions and is dependent on the part geometry, wax type, and alloy type. Tooling is made from blocks of aluminum which part in the middle leaving an open cavity to be filled with wax.
Tooling can have multiple cavities, automatic side cores, and ejection pins to allow for faster processing. Some undercuts and internal features can be created with automatic side cores built into the tool. If geometries cannot be made with side cores from the tool and will have trouble shelling later do to size, shape, and location – ceramic cores can be placed in the tool. Wax will fill around the cores and keep the complex space from affecting the desired pattern geometry. These cores can be dissolved later on in the process. Once the tooling has been cut and assembled it is ready to begin the process at injection.
Wax Injection –
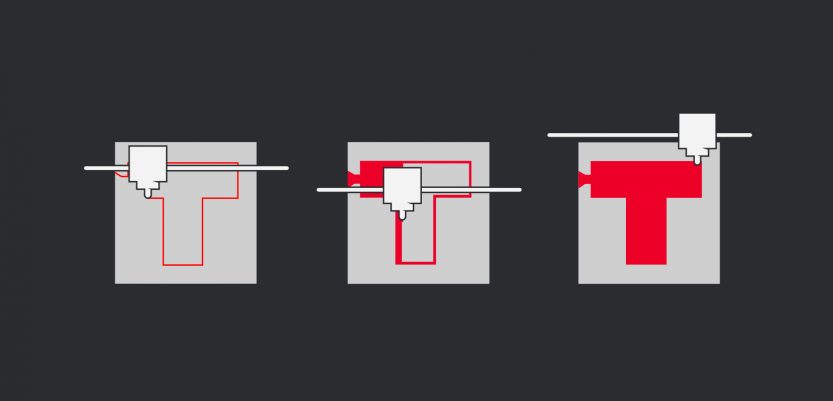
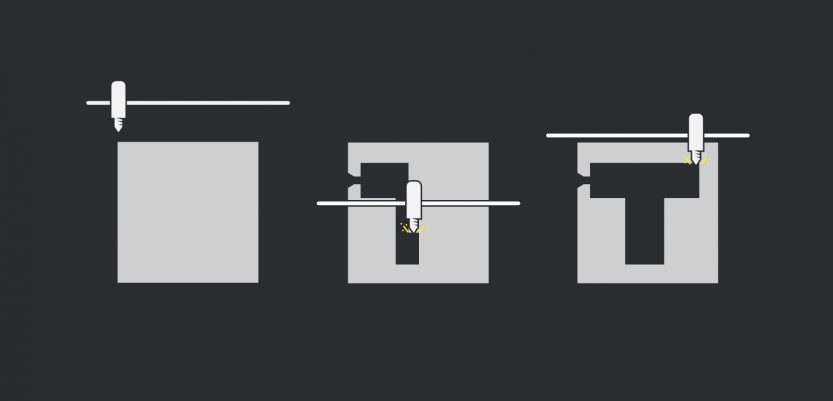
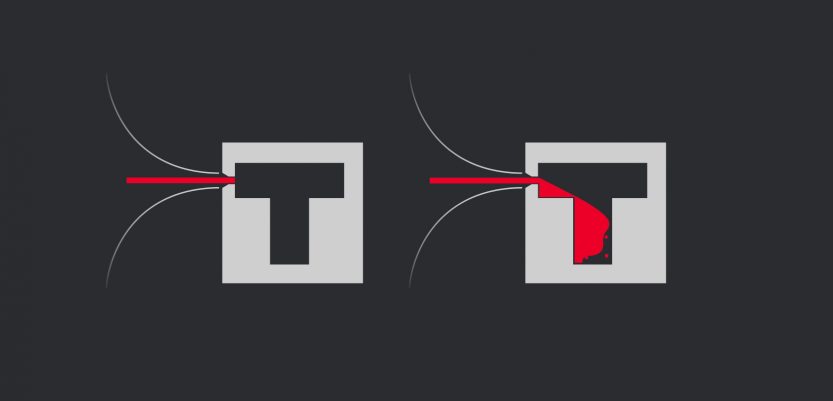
The wax injection tooling created in the first step serves as a cavity that will be filled with liquid wax, allow the wax to solidify, and produce a positive of the final component in wax. Note that the wax patterns dimensions will still be larger than the final component because additional contraction will occur inside of the ceramic mold as the metal solidifies. Tooling is located and clamped to a stationary table with a moving platen clamping the top half of the die. A hydraulic cylinder lifts and closes the top half of the die so that parts can be removed. Once clamped in the wax press an injection nozzle will be aligned with the injection sprue of the tool. The injection sprue is simply a path that the wax will follow as it is injected though the tool and into the cavity which will create a positive of the pattern.
Wax pellets are melted into a large holding tank located on the wax injection press. The tank holds the wax at a liquid and is constantly agitated to ensure a homogeneous mixture of the wax constituents. A hydraulic cylinder moves the wax into an injection cylinder to prepare for injection. Once the tool is closed, another hydraulic cylinder will push the wax through a heated hose and into the tool via the injection sprue, filling the cavity and allowing the wax to solidify inside. Once solidified, the two halves of the die will open and the wax pattern will be removed from the tool. The wax injection operator will close the tool and start the next injection. While the next injection is taking place, the operator will remove the injection runner from the pattern and place the completed pattern on a tray. A gate is left on the patterns which will serve as a connection point to the wax runner in the next step in the process. At this point the wax patterns are now ready to move to wax assembly.
Wax Assembly –
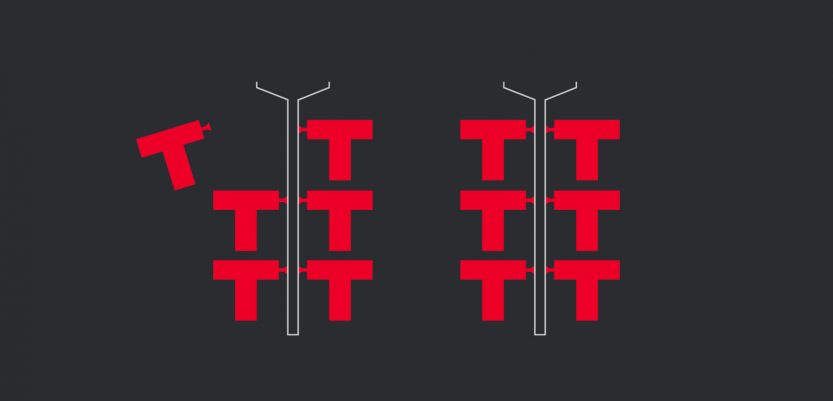
Once the wax pattern is complete, it must be assembled onto a wax runner. The wax runner will have multiple wax patterns attached to it and will later serve as a metal feeding system to supply all of the individual parts with metal during casting. Before the wax runner has patterns assembled to it, some steps must take place to prepare the runner for assembly. The runners are injected in wax with a process identical to the injection of wax patterns. The only difference is that a metal component is located at the end which has the wax injected around it; after injection this metal component has a pin fastened to it that extrudes from the end and can be connected to a hanger plate during shelling in the next process. A ceramic cup is also attached to the end of the wax assembly. This ceramic cup will be locked to the ceramic mold during shelling and will act as a funnel for the metal when it is poured in during casting.
Once the runner is completed, the wax patterns are attached by their gates to the runner. This is done by melting the gate of the pattern on the surface that will interface with the runner and dipping it in a hot melt adhesive wax before pressing it to the runner. The waxes will fuse together locking the patterns to the runner. The area around the gate/runner interface will then be welded with a small torch to make a smooth connection all the way around. Once all of the patterns are attached to the completed runner the completed product is called an assembly. The completed assemblies are then ready to move the shelling as the next process.
Thanks for reading. Be sure to check back for the next post in the “What is Investment Casting?” series where we cover the shelling process in greater detail.